****
ULTRASOUND GUIDED PARACENTESIS
- Position the Patient: After the patient empties his or her bladder, have them lie upright with the head of the bed elevated 45-60°. This angle allows the bowel to float up and the ascites to collect in the lower abdomen.
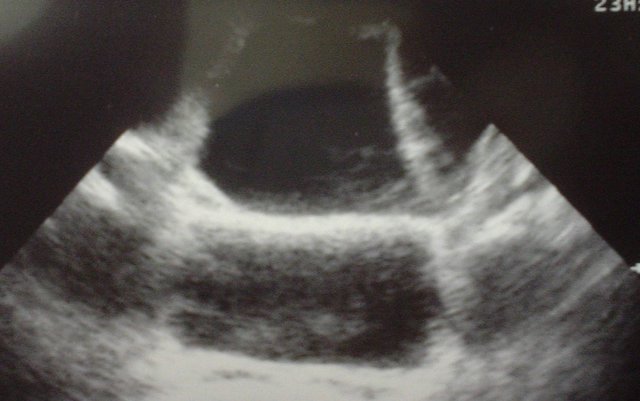
- Ultrasound for the Best Fluid Pocket: Using the curvilinear probe, check both lower quadrants and the midline to find the largest pocket of anechoic (black) ascites fluid. DO NOT reposition the patient after this step until the procedure has been completed. Fluid pockets may move with patient repositioning. Any free flowing fluid within the peritoneal fluid will appear black. Urine, liquid stool, inflammatory fluid and unclotted blood may all appear similar to ascites so correlate clinically.
- Avoid Vessels: Consider using the small parts probe to find and avoid abdominal wall vessels as lacerating these can be fatal.
- Do the Tap: Most practitioners will localize a fluid pocket with ultrasound and then finish the procedure “blind”. Alternatively you may use a sterile probe cover to visualize your procedure in real time. If you chose the latter, you may want to have an assistant hold the ultrasound probe for you so that you have use of both of your hands
****
ULTRASOUND GUIDED THORACENTESIS
- Position the Patient: Place the patient in a position of comfort for them and you. The ideal position is usually seated upright with legs over the edge of the bed and leaning forward onto pillows on top of a Mayo stand or rolling table. Remember that fluid moves with patient repositioning, and unless loculated will usually flow to the most dependent area of the body cavity in question.
- Choose your Probe: Often times, the linear array transducer can be used to visualize superficial collections of pleural fluid in thin patients. However in most cases the curvilinear probe will be better, especially if the patient has increased muscle mass or thick subcutaneous tissue. The curvilinear probe also provides better visualization of deeper structures.
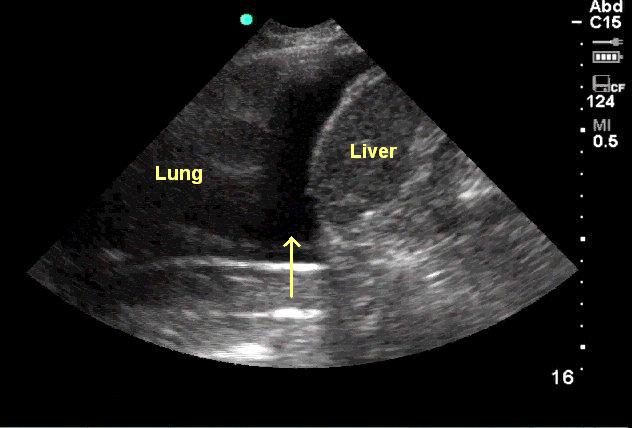
- Identify your Target: Clearly identify the lung parenchyma, the pleural fluid, the diaphragm, and adjacent organs such as the liver or spleen. Remember that the lungs and adjacent organs will have a mixed echogenic appearance on ultrasound, whereas the pleural fluid will appear anechoic (black), and the diaphragm will appear hyperechoic (white). Map out the superior and inferior borders of the fluid collection and determine the best place to perform the thoracentesis, taking into account anatomic variations during the respiratory cycle.
- Proceed: Once all of the thoracic structures have been localized, the thoracentesis can be attempted in a static or dynamic fashion. If the procedure is performed in a dynamic manner, remember to use sterile ultrasound gel and prep the ultrasound probe in a sterile fashion. Direct visualization of the needle will only be noted when the ultrasound beam is angled directly at the needle. Ultrasound “mapping” of the best location followed by a static puncture is usually less cumbersome and equally safe.
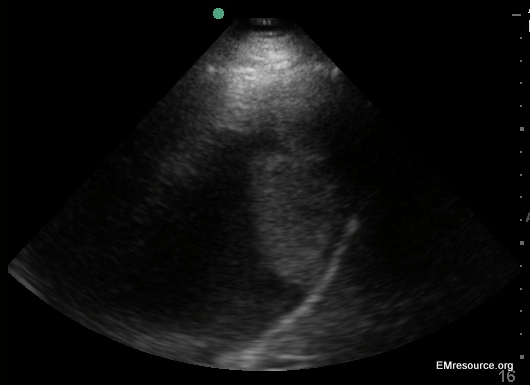
Pleural effusion with diaphragmatic mass
****
ULTRASOUND GUIDED CENTRAL LINE
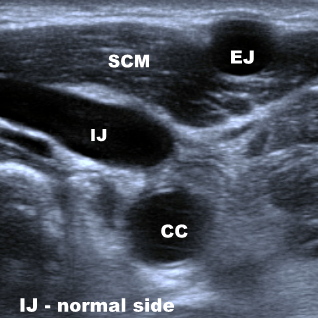
- Have the patient move their neck sdie to side while looking with the ultrasound. You can choose the degree of rotation with the least overlap between the IJ and the carotid artery. Beware of variable location of vascular structures. Compare sides looking for the larger vein
- Position the ultrasound machine on the same side of the bed you are on with the screen facing you. This helps avoid left-right confusion.
- The vein will collapse with pressure from the probe (unless there is a DVT there in which case choose another site) and will distend with dependent positioning or Valsalva maneuver. If you cannot see the vein, try releasing pressure or having the patient bear down. If you are not sure which is the vein use doppler flow, compression or color flow to assist you or ask for help.
- Touch the probe with your fingertip while watching the screen to double check left from right and be sure you are in tune with which side is which.
- There are two approaches. The transverse approach which is easier to learn and is generally preferred is discussed first.
- Enter the vein close to vertical. This will make it easier to see the needle. Once you are in, or nearly in, adjust to a more shallow angle to avoid a thru-and-thru poke.
- Keep the vein in the center of your screen and the needle at the center of the probe.
- Use a poking or bouncing technique at needle insertion. Motion makes it easier to track your needle.
- Try to track the needle tip, which is the easiest part to see, with your probe by using a fanning motion.
- Unfotunately, metal is difficult to see with ultrasound so you may have to rely as much on motion of tissue planes and downward tenting of the vein wall as you enter it.
- Utilize your colleagues who have more experience than you do, whether it is another emergency physician, or an interventional radiologist
- Pre-load your syringe with lidocaine. When you inject you will notice an obvious white blush. This may help you keep track of the needle tip and has the added bonus of better analgesia. Be aware that venous blood will be much brighter when aspirated into a syringe that still has any lidocaine in it. Also, even a tiny air bubble that is accidentally injected may completely obscure your view of the vein.
- Use the “SCUBA” mnemonic to hit all the key issues in your procedure note. “S” is for Site chosen and reasons why. “C” is for use of Chlorhexidine to prep the skin, as it is more efficacious than Betadine, and also for documenting Consent. “U” is for real time Ultrasound guidance or pre-procedural localization. “B” is for use of wide sterile Barriers, and “A” is for use of an Antibiotic impregnated central line catheter.
- Left-right confusion can lead to missing the mark and traumatic complications.
- Inadvertently injecting an air bubble can completely obliterate your view and force you to abandon the procedure and go to the other side.
- Beware of looking at the needle shaft while the tip is actually elsewhere, such as tickling the carotid artery.
- A longitudinal approach is technically more difficult to master because it is hard to perfectly align the probe and the needle. The benefit of the longitudinal approach is that if you can view the entire needle length you will have more spatial information to guide you.
- You can also use ultrasound guidance to canulate peripheral veins with the cephalic vein and the basilic vein being the primary targets. Use sections of the vein that are straight for at least 3cm and also less than 1cm deep if possible. Don’t use standard 1 inch catheters. Use catheters that are at least 1.75 inches long.
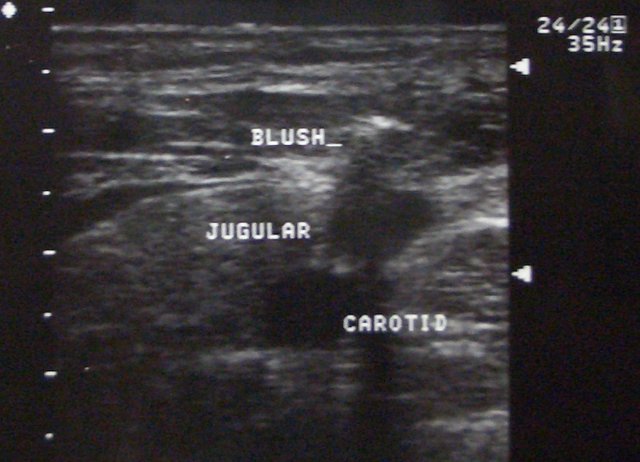
TRICK: White Blush from injecting lidocaine helps locate needle tip during Central Line insertion under real-time ultrasound guidance. CAUTION: injecting even the tiniest air bubble can destroy your view!
*
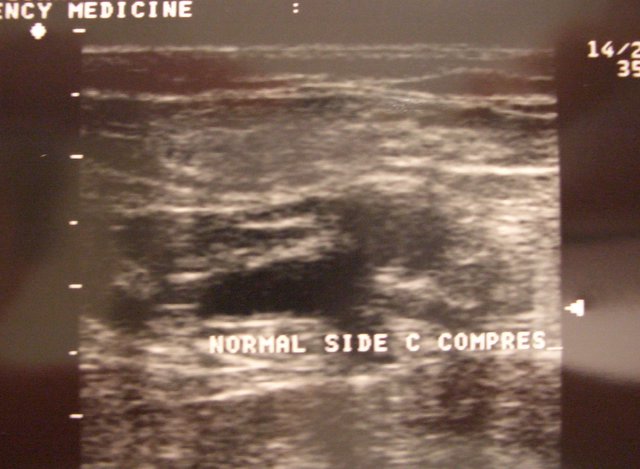
Normal Femoral Vein under Compression collapses
****
ULTRASOUND GUIDED LUMBAR PUNCTURE
- First described in 1971, an Ultrasound Guided LP can be utilized in patients in whom the landmark approach may be difficult (e.g. patients who are obese, have scoliosis, or those who are unable to create a kyphotic lumbar curve for the procedure).
- Position the patient in a lateral decubitus fetal position
- Use the longest 5 MHz or 7.5 MHz linear probe available
- Start by placing the transducer in a transverse plane over the midline of the patient’s back at the level of the iliac crests. In this view, the spinous processes will cast a dark shadow across the screen. Center the dark shadow in the middle of your ultrasound probe. Use a marker to identify this point as midline on your patient’s back. Extend a short line from cephalad to caudad along this point to clearly distinguish midline.
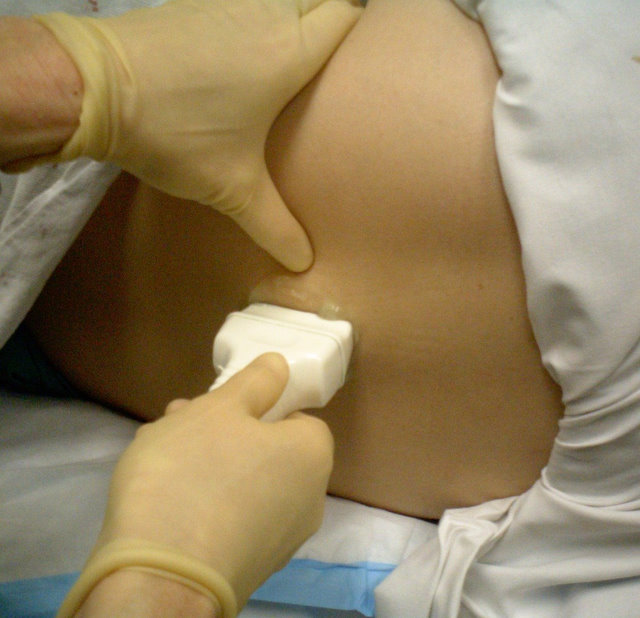
- Once you’ve demarcated where midline is, rotate the transducer 90? so that it lies parallel to the spine. The spinous processes in this view will appear as hyperechoic(white) curves casting dark shadows farfield to your transducer. Center the transducer over the spinous processes and try to catch two spinous processes on your field. Use a marker to identify the interspinous space. Extend a short line going from the patient’s left to right along this point. Direct your spinal needle towards the point where this interspace line bisects your midline line.
- An LP Guided Ultrasound can be performed in a static or dynamic manner, depending on the number of personnel available to help with the procedure. If you are performing the procedure in a dynamic “real time” manner, remember to use sterile ultrasound gel and prep your ultrasound probe in a sterile fashion. In a static manner the ultrasound is used for localization and marking, then the patient is prepped and draped in the normal sterile fashion and the procedure is performed using pen marks as guides.
Probe Placement: Longitudinal. (Image courtesy of Teresa Wu, MD)
****
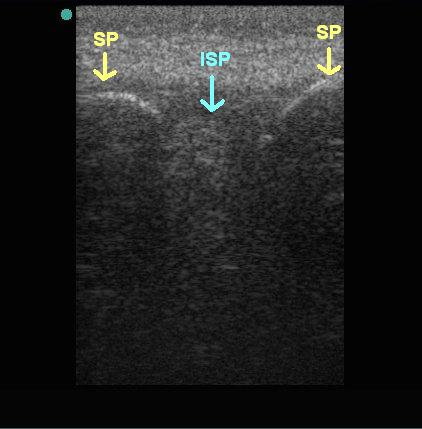
SP = Spinous Process. ISP = Intra-Spinous Space
(Image courtesy of Teresa Wu, MD)
****
Do you want a pocket reference that has essential material on ED Ultrasound as well as other imaging, labs, EKG’s, procedures, risk management and more?
Then get the Tarascon Emergency Department Quick Reference Guide

****
WOULD YOU LIKE TO USE ONE OF OUR IMAGES?
As long as you paste the following statement with a weblink to this site, no problem: “Image reproduced with permission, ERPocketBooks.com”
****